
Below you will find a range of training, instructional and support information for using the RIW System. You can browse the various categories, or type keywords into the search box. If you are new to RIW, please view the Getting Started category.
Knowledge Centre Search
Video - Creating projects, sites and zones
RIW Knowledge Centre Article Link:
https://support.riw.net.au/support/solutions/articles/51000077424
Did you find it helpful? Yes No
Send feedbackVideo - Shifts/Swipes and the Muster List for Employers and Project Administrators
RIW Knowledge Centre Article Link:
https://support.riw.net.au/support/solutions/articles/51000034507
Did you find it helpful? Yes No
Send feedbackHow does a Network Operator set up a project and Contractor in Charge in the RIW System?
Network Operators are the only user group (apart from the RIW Service Desk) that can create a new project. During the creation of a project, the Network Operator is responsible for listing the Contractor in Charge (CIC). The CIC can then create sites and zones to assist with managing the workforce and activities occurring in and around the project.
This instruction applies to the following RIW System User Roles:
- Helpdesk
- Network Manager
- Network Manager - Read Only (note: Read only access available)
Step 1: Log in to the RIW System
Go to https://app.riw.net.au and log in using your Network Operator credentials
Step 2: Create / Manage Project
Click on the Create / Manage Projects shortcut available on the Main Dashboard.

Alternatively, you can click on the Administration tab at the top of the screen, followed by the Projects shortcut
Step 3: Add Project
Click on the Add button.

Step 4: Define Project
Enter the project name and description and assign the Contractor In Charge (CIC). To be assigned as the CIC. To assign the project to a CIC, start to type the name of the contractor and the name will appear from the drop-down menu. Click Save when complete.

Step 5: Define Project Requirements.
If required, the Network Operator may add any competency or job role requirements (optional) that will be set as prerequisites for the project by clicking on the Requirements tab on the left-hand side menu. Click on the Add button to add these.

Step 6: Add Entry Rules
On the Add Entry Rules screen, specify the competency or job roles required for the project. Please note when adding requirements that variable groups of requirements can be created where either:
- All of the requirements in one (or more) groups are required (using the AND operator)
- Only one of the multiple requirements in one or more groups is required (using the OR operator)
- A single group or combinations of such groups are required.
Please read the detail on the Add Entry Rules screen for further directions.
Search for each requirement in the relevant competency or job role field by starting to type in the field. In the example below, we have added a generic MTA induction as a Network-based competency, and the National - Around the Track Personnel job role.

When the required competency or job role has surfaced, click Add to add it to the requirements. The requirements will now display on the bottom of the screen.

When complete, click Save.
Project requirements have now been set.
To add a site to the Project, please refer to the RIW Knowledge Centre article How does a company create a site or edit site requirements? When a site has been added to the project following this process, the related sites will now display in the Sites tab.

VIDEO: Creating Projects, Sites and Zones
RIW Knowledge Centre Article Link:
https://support.riw.net.au/support/solutions/articles/5100003046
Did you find it helpful? Yes No
Send feedbackHow does a company configure site working hours rules?
The article details how the working hours for sites can be configured to control the access and the hours worked by cardholders. Please also refer to our RIW Knowledge Centre article Shift Management - How are open shifts closed in the RIW System? for more information about automatic rules that are in place to manage open shifts.
Working Hour Rules are defined as maximum allowable working hours over a defined period, minimum rest period between shifts and maximum mid-shift break and applied to all methods of swipe-ins to a site.
When working hour rules have been set for the site and a cardholder does not meet these requirements, the cardholder will be automatically denied access to the site. This is detailed in our article RIW App for Access Controllers, and in particular the section on Deny/Restricted Access - Outside Working Hour Rules.
IMPORTANT NOTE FOR KIOSKS USERS
When updating site requirements in the RIW System, it can take between 15-30 minutes for any changes to be transferred to a Kiosk or Tablet device, such as site entry rules, working hour rules, site briefings or site inductions. Sites should assess the risk between when the change is made in the RIW System to when it is available in the Kiosk and determine whether alternative access control measures are required during the update period.
This instruction applies to the following user roles:
- Advanced Project Admin
- Employer Admin
- Employer Admin - No Payment
- Helpdesk
- Project Admin
- Site Admin
1 | Go to https://app.riw.net.au and log in using your credentials. |
2 | Click on Administration > Site. |
3 | On the Site screen, select the site by highlighting the row and click Edit.
|
4 | Click on Working Hours Rules from the left-hand menu and complete the fields in the box:
Apply Working Hours Rules?
Maximum Hours Worked
Over What Period? (Hours)
Minimum Rest Period (Hours)
Maximum Mid-Shift Break (Minutes)
The numbers entered in each of the rules fields can be increased or decreased by clicking in the relevant text box and using the up/down arrows. When the rules have been defined, click Save. |


When working hour rules have been exceeded by a cardholder, a notification will be sent to designated site contacts and network contacts.
Article link:
https://support.riw.net.au/support/solutions/articles/51000152294
Did you find it helpful? Yes No
Send feedbackHow does a company add a site or edit site requirements?
Companies assigned as the Contractor in Charge (CIC) of a project can create sites and zones, assign competencies or job role prerequisites for site access (optional).
A project is assigned by a Network Operator to a CIC. Only once assigned to an organisation, can they create sites and zones.
IMPORTANT NOTE FOR KIOSKS USERS
When updating site requirements in the RIW System, it can take between 15-30 minutes for any changes to be transferred to a Kiosk, such as site entry rules, working hour rules, site briefings or site inductions. Sites should assess the risk between when the change is made in the RIW System to when it is available in the Kiosk and determine whether alternative access control measures are required during the update period.
This instruction applies to the following RIW System User Roles:
- Advanced Project Admin
- Employer Admin (where designated as a Contractor In Charge of a project)
- Employer Admin - No Payment (where designated as a Contractor In Charge of a project)
- Helpdesk
- Network Manager
- Project Admin
- Site Admin
1 | Go to https://app.riw.net.au and log in using your credentials. |
2 | Click on Administration > Site.  |
3 | To add a new site, click on Add. |
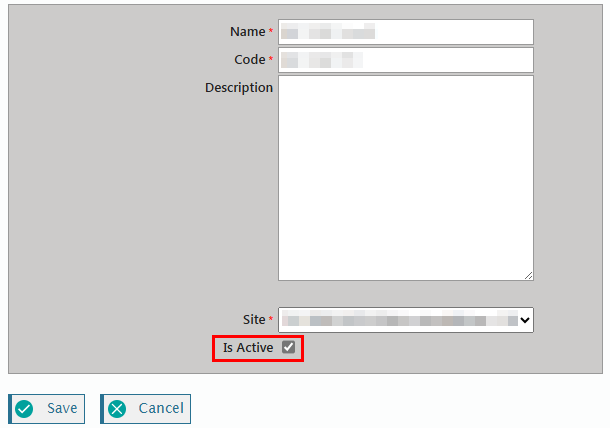
4 | Fill out the site details, noting that any fields marked with a red asterisk (*) are mandatory.
To determine if the address can be validated, click on Test Address. If the site is a greenfields site with no current street address, an approximate location will be determined by the suburb, state and postcode. Or try to use a close street location for a better match.
Click Save to complete. |
5 | Once the site has been created, site requirements may be added. Site requirements are prerequisite competencies or job roles that a cardholder must obtain prior to being granted entry to the site. Click on the Requirements tab on the left hand side menu. To add a requirement, click on the Add button.
|
6 | On the Add Entry Rules screen, specify the competency or job roles required for the site. Please note when adding requirements that there are different styles of requirement groupings.
Please read the detail on the Add Entry Rules screen for further direction.
Site requirements have now been set. |


For more information about other requirements you can set on this screen, please refer to:
- How does a company add site contacts?
- How does a company add site hosts?
- How does a company configure site working hours rules?
- How does a company set breathalyser requirements for a Kiosk in the RIW System?
- How does a company add and configure kiosk briefings?
Article Link:
https://support.riw.net.au/support/solutions/articles/51000029732
Did you find it helpful? Yes No
Send feedbackHow does a company create a zone or edit zone requirements?
This article details how a contractor in charge (CIC) of a project can manage and maintain the zones associated with sites linked to their projects.
This instruction applies to the following RIW System User Roles:
- Advanced Project Admin
- Employer Admin
- Employer Admin - No Payment
- Project Admin
Step 1: Log in to the RIW System
Go to https://app.riw.net.au and login using your credentials.
Step 2: Administration tab
Click on the Administration tab.

Step 3: Zone shortcut
Click on the Zone shortcut.

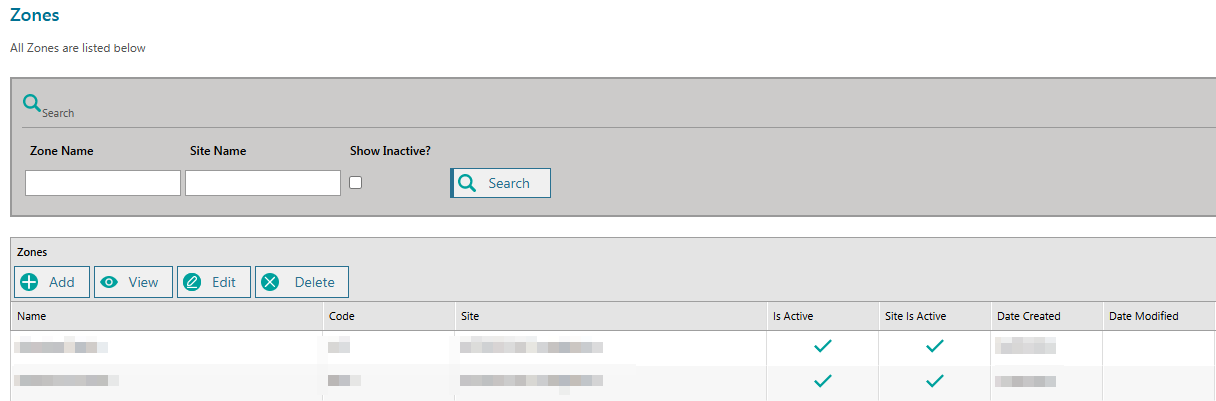
Step 4: Zone listing
The list of zones will appear.
By default, only the active zones will appear. Tick the Show Inactive? box and click the Search button to include inactive zones in the listing.
Use the Name filter to select a specific zone or site and click the Search button.
Step 5: Add a zone
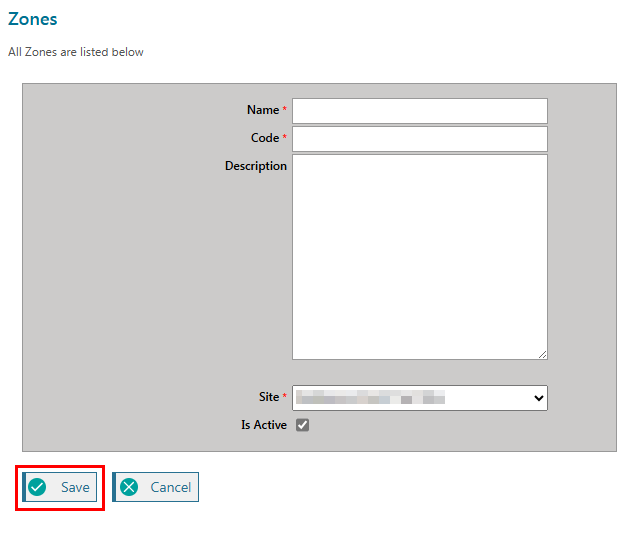
To add a zone, click on the Add button.

Step 6: Define the zone
Enter the zone name, code, and description. Use the drop-down list to associate the zone to the relevant site.
The Is Active box should be ticked if the zone is active.
Click save when complete.
Step 7: Edit a zone
To edit a zone, return to the Zone shortcut available on the Administration tab, and click Search to surface a list of available zones. Choose the zone to be edited and click on the Edit button.
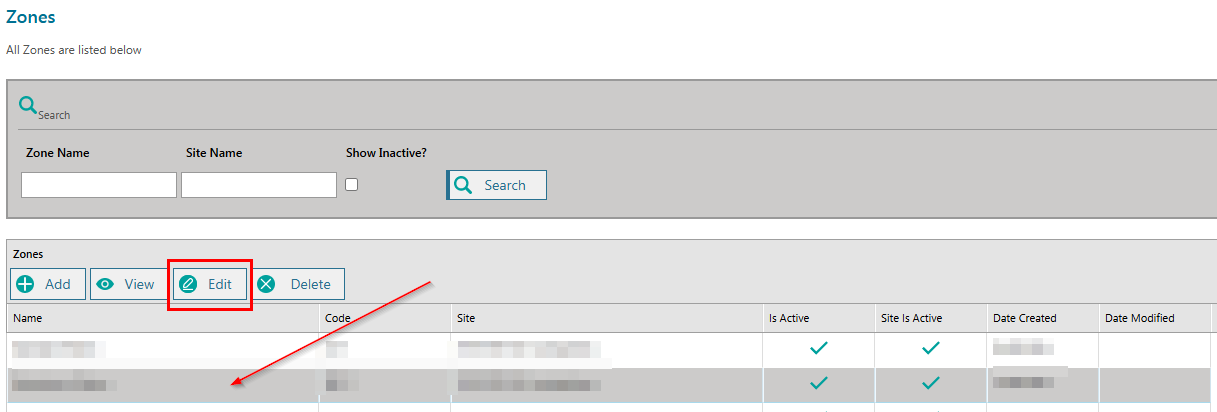
From here, you can update any of the zone requirements, including name, code, description or the assigned site relationship.
Step 8: Add Zone Requirements
Once the zone has been created, zone requirements may be added, which are prerequisite competencies cardholders must obtain prior to being granted entry to the zone.
Go to the Zone shortcut available on the Administration tab, and click Search to produce a list of available zones.
Select the zone to be edited and click on the Edit button.
Click on the Requirements tab on the left hand side menu. To add a requirement, click on the Add button.
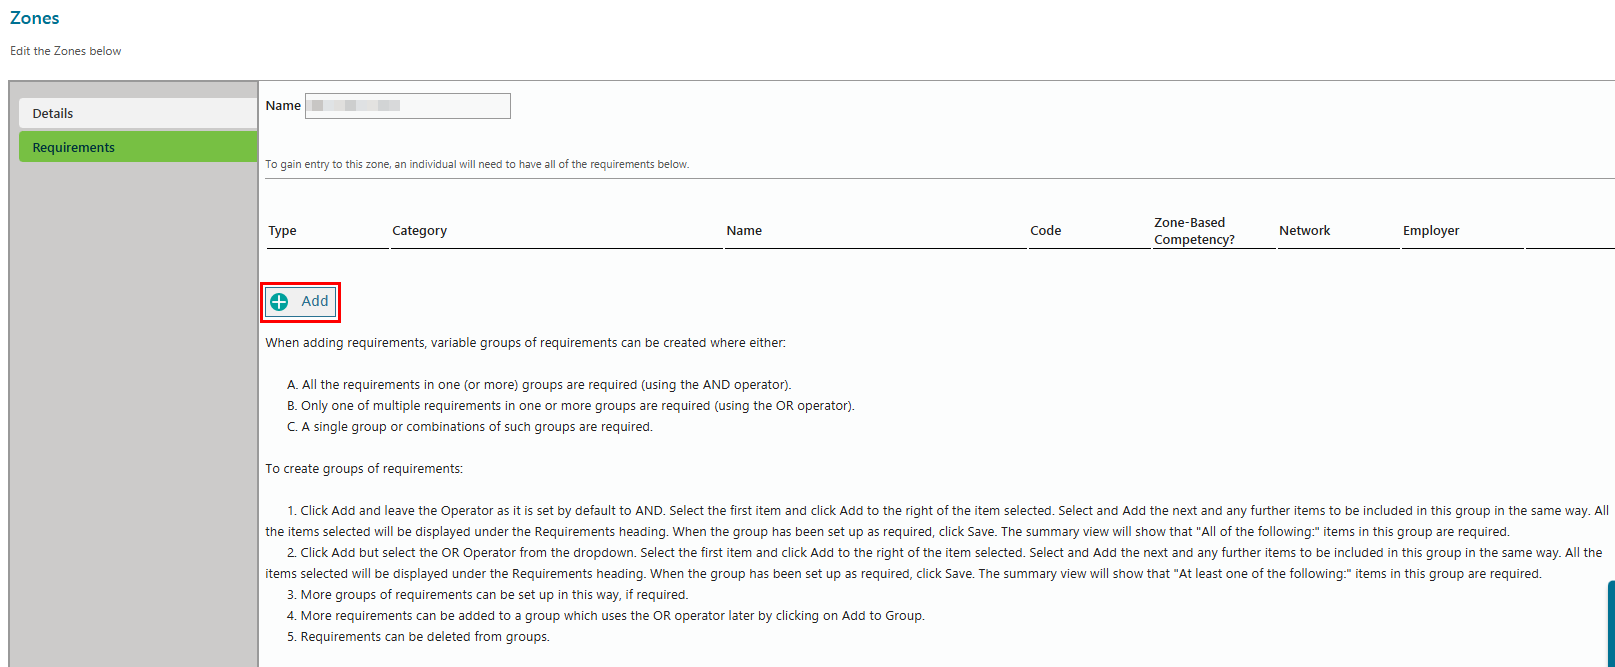
Step 9: Add Entry Rules
On the Add Entry Rules screen, specify the competency or job roles required for the zone. Please note when adding requirements that variable groups of requirements can be created where either:
- All of the requirements in one (or more) groups are required (using the AND operator)
- Only one of multiple requirements in one or more groups are required (using the OR operator)
- A singe group or combinations of such groups are required.
Please read the detail on the Add Entry Rules screen for further direction.
Search for each requirement in the relevant competency or job role field by starting to type in the field. In the example below, we have added the National competency Safely Access the Rail Corridor and the National - Around the Track Personnel job role.

When the required competency or job role has been surfaced, click Add to add it to the requirements. The requirements will now display at the bottom of the screen.
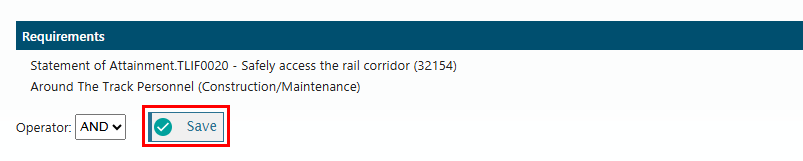
When complete, click Save.
Zone requirements have now been set.
Step 10: Deactivating a zone
To deactivate a zone, select the zone and click Edit. In the Details section, deselect the Is Active checkbox.
This zone will not be available to Access Controllers/Spot Checkers using the mobile RIW app, PC Card Reader or Web Card Reader.
VIDEO: Creating Projects, Sites and Zones
RIW Knowledge Centre Article Link:
https://support.riw.net.au/support/solutions/articles/51000151955
Did you find it helpful? Yes No
Send feedbackHow does the RIW System manage projects with multiple Principal Contractors?
In the RIW System, the Network Operator is responsible for selecting one Contractor in Charge for each Project. Where the Contractor in Charge is also the Principal Contractor (for OHS purposes), there will still only be one Contractor in Charge in the system.
Where the Project is being delivered by a Joint Venture and the Contractor in Charge is an accredited rail transport operator, but the Joint Venture wishes to nominate a Principal Contractor (for OHS purposes), this can still take place.
However, within the RIW System, the Contractor in Charge is whoever was selected by the Network Operator at the creation of the Project. Please refer to our article on How does a Network Operator set up a project in the RIW system?
RIW Knowledge Centre Article Link:
https://support.riw.net.au/support/solutions/articles/51000030119
Did you find it helpful? Yes No
Send feedbackHow does a company view which crew a cardholder is assigned to?
Premium Functionality Employers have the ability to create crews, which are groupings of RIW cardholders. There are two distinct types of crews:
- Company Crews
- Project Crews
Company crews are only able to be edited and managed by the Employer Administrators of the company, whereas Project crews can also be managed by Advanced Project Administrators.
This instruction applies to the following RIW System User Roles:
- Advanced Project Admin
- Employer Admin (Premium Functionality Employer)
- Employer Admin - No Payment (Premium Functionality Employer)
- Employer Admin - Read Only (Premium Functionality Employer)
Step 1: Log in to the RIW System
Go to https://app.riw.net.au and login using your credentials.
Step 2: Search for My People
On the main dashboard, click on the Search for My People shortcut.

Step 3: Search Criteria
Complete search criteria to find the cardholder and click on the Search button.

Step 4: Select cardholder
From the returned results, highlight the cardholder row and click on the Edit button.

Step 5: Crews tab
Select the Crews tab from the left hand side of the cardholder profile.

Step 6: View crew information
The information on the crews that the cardholder has been allocated to will appear in this screen and include the date the cardholder was added to the crew and the date the cardholder was removed from the crew (if applicable).

Please note that if the crew is project based, the project name will appear under the Project field.
RIW Knowledge Centre Article:
https://support.riw.net.au/support/solutions/articles/51000150612
Did you find it helpful? Yes No
Send feedbackHow does a company add site contacts?
This article details how a company can add site contacts in the RIW System. Site contacts will receive RIW System notifications as detailed in our article What notifications are sent to site contacts?
Up to 6 contacts can be added per site. Please note that all site contacts will receive all the alert notifications.
This instruction applies to the following user roles:
- Advanced Project Admin
- Employer Admin
- Employer Admin - No Payment
- Helpdesk
- Project Admin
- Site Admin
1 | Go to https://app.riw.net.au and log in using your credentials. |
2 | Click on Administration > Site. |
3 | A list of available sites will display. Use Search to filter the list. Select the site you wish to add site contacts by highlighting the row and clicking the Edit button.
|
4 | On the Contacts tab a list of current contacts will appear. Click on the Add button to add a new contact.
|
5 | If the contact is a cardholder, populate the Search fields and click Search to surface a list of potential contacts.
When the contact is located, highlight the required contact and click on the Select button. Confirm the contact is correct and click on the Save button.
Note: If any amendments are made to the email or mobile number of the cardholder, this will automatically update the cardholders RIW profile. |
6 | If the site contact is not a cardholder, enter the persons details into the bottom half of the screen and click Save.
When adding a mobile phone number, the default is the Australian area code. If using an international number, please prefix with +{areacode}. |


Article link:
https://support.riw.net.au/support/solutions/articles/51000152312
Did you find it helpful? Yes No
Send feedbackWhat notifications are sent to site contacts?
SMS and/or email alert notifications are sent to designated site contacts when a triggered swipe event occurs in the RIW System.
To set up a designated site contact, refer to our article How does a company add site contacts?
This instruction applies to the following user roles:
- Site contacts
Site Kiosk Deny Reasons
- Cardholder missing job role or competency requirements
- Cardholder no primary employer
- Cardholder subscription expired
- RIW card cancelled
- RIW card expired
- Network, National or site block exists
- Fatigue breach (outside working hour rules)
- Breath alcohol non-negative result recorded
- Visitor pass not valid for site
- Visitor pass invalid date
- Visitor pass cancelled
- Visitor pass limit exceeded
- Visitor - host not on site
Access Controller Deny Reasons (RIW App or Web Card Reader)
- Cardholder missing job role or competency requirements
- Cardholder no primary employer
- Cardholder subscription expired
- RIW card cancelled
- RIW card expired
- Network, National or site block exists
- Fatigue breach (outside working hour rules)
- Risk Assessed Swipe In (override denied swipe)
- Cardholder manual deny reason
- Appears unfit for duty
- Does not hold correct competencies
- Does not hold correct roles
- Inadequate PPE
- Inappropriate behaviour
- Other Network block
- Visitor manual deny reason
- Appears unfit for duty
- Does not hold correct competencies
- Does not hold correct roles
- Inadequate PPE
- Inappropriate behaviour
Article Link:
https://support.riw.net.au/support/solutions/articles/51000152329
Did you find it helpful? Yes No
Send feedbackHow does a company schedule or view a site-based competency?
The Schedule a Site-Based Competency function allows an e-notification advisory prompt to be sent to the Access Controller(s) of a particular site using the RIW app, PC Card Reader or Web Card Reader. The e-notification alerts the Access Controller(s) of the site requirement to deliver a site-based competency (e.g. a toolbox talk, site briefing or induction) which can be delivered and awarded to cardholders upon swiping in or attending pre-start (or equivalent).
The View Scheduled Site-Based Competency function allows visibility of the competencies which have been scheduled.
This instruction applies to the following RIW System User Roles:
- Advanced Project Admin
- Employer Admin
- Employer Admin - No Payment
- Employer Admin - Read Only
- Helpdesk
- Project Admin
- Site Admin
Please note that Employer Admin-Read Only credentials cannot schedule a site-based competency, only view the site-based competency.
Step 1: Log in to the RIW System
Go to https://app.riw.net.au and login using your credentials.
Step 2: Competencies tab
From the tabs at the top of the screen, click on the Competencies tab.

Step 3: Schedule Site-Based Competency
Click on Schedule Site-Based Competency shortcut..

Step 4: Select the sites
Highlight the site for the competency to be delivered and click on the Add button. This will move the site to the Selected Sites panel. Repeat this process if multiple sites are involved.

Step 5: Select the competency
Start typing the competency name in the Site-Based Competency field and a selection of competencies will appear. Highlight and select the correct competency.

Step 6: Set a due date
In the Due Date field, select a date. This is the date by which the competency must be awarded, after this date, the notification about the scheduled competency will no longer be shown to the Access Controller.
Step 7:Add the scheduled site-based competency
Once all the information regarding the scheduled site-based competency is correct, click the Add button.
Step 8: Viewing a scheduled site-based competency
Click on View Schedule Site-Based Competency shortcut.

Step 9: Search for competency
Complete search criteria and click on Search button.

For all scheduled competencies to be included in the search results, do not include any search criteria.
Step 10: Search results
Search results of the scheduled site-based competencies will appear. From this screen, clicking on a competency and the delete button will delete the scheduled site based competency.

RIW Knowledge Centre Article Link:
https://support.riw.net.au/support/solutions/articles/51000150865
Did you find it helpful? Yes No
Send feedbackHow does a company edit a project or project requirements?
Contractors in charge of projects need to set out the competency and job role requirements for cardholders working on each project. This article details how a Contractor In Charge of a project can add or edit project requirements.
This instruction applies to the following RIW System User Roles:
- Advanced Project Admin
- Employer Admin
- Employer Admin - No Payment
- Network Manager
- Project Admin
Step 1: Log in to the RIW System
Go to https://app.riw.net.au and login using your credentials.
Step 2: Administration tab
Click on the Administration tab that is situated at the top of the screen.

Step 3: Project shortcut
Click on the Project shortcut.

Step 4: Project listing
A listing of all active projects will appear. To include past (inactive) projects, tick the Show Inactive? box and click on the Search button.
The projects listed include the following details:
- Project name
- Network
- Contractor in charge
- Sites

To edit a project, highlight the row and click on the Edit button.
Step 5: Details tab
The Details tab will appear. Information in this tab cannot be edited by contractors.
Information in this tab can only be edited by the Network Operator or the RIW Service Desk.

Step 6: Requirements tab
Click on the Requirements tab.

Information on the cardholder requirements to enter the project can be entered here by clicking the Add button.
Step 7: Adding Entry Rules
On the Add Entry Rules screen, specify the competency or job roles required for the project. Please note when adding requirements that variable groups of requirements can be created where either:
- All of the requirements in a group is required (using the AND operator)
- Only one of multiple requirements is required (using the OR operator)
- A singe group or combinations of such groups are required.
Please read the detail on the Add Entry Rules screen for further direction.
Search for each requirement in the relevant competency or job role field by starting to type in the field. In the example below, we have added a generic MTA induction as a Network based competency, and the National - Around the Track Personnel job role.
When the required competency or job role has appeared, click Add to add it to the requirements. The requirements will now display at the bottom of the screen.
When complete, click Save.
Project requirements have now been set.
VIDEO: Creating Projects, Sites and Zones
RIW Knowledge Centre Article Link:
https://support.riw.net.au/support/solutions/articles/51000153392
Did you find it helpful? Yes No
Send feedbackHow to use the muster list
The article details how to use the muster list in the RIW System, which is a summary of all Rail Industry Workers and visitors currently swiped into a site.
This instruction applies to the following user roles:
- Advanced Project Admin
- Network Manager
- Network Manager - Read Only
- Project Admin
- Site Admin
1 | Go to https://app.riw.net.au and log in using your credentials. |
2 | On the main dashboard, click on the Muster List shortcut. |
3 | On the Muster List screen, all Rail Industry Workers and visitors currently signed into to sites will display, noting the following visibility permissions:
You can refine the search by looking for a particular Rail Industry Worker, or by Project, Site, Job Role or Competency. Click Search to refresh the screen.
 Clicking on any of the filter buttons can also be used to refine the list by Hierarchy, Project or Site.
You can sort each column by clicking on the column header, and you can drag and drop columns into a preferred order.
You can also Export the list to a CSV file.
|
4 | Below the data table you will also find a map view of the muster list, showing all people swiped in at the Network, Project or Site level, dependent on your visibility permission.  If you adjust the search parameters or filters in the data table, you must click Search to refresh the map view. Interacting with the map by double clicking on a site icon will refresh the data table and display only that site data. Depending on your view, the information window will display how many projects and sites are visible in the view, and how many individuals are currently swiped in to the sites. It will also provide a heat map of when swipe activity occurred (note: this is in UTC time).  |
5 | You can toggle between a Map or Satellite view, fullscreen or tilt view, or use the zoom in or zoom out functions. |

For more information on how to use the muster list to swipe people out of site, refer to How to use the muster list to swipe workers and visitors out of site.
Article link:
https://support.riw.net.au/support/solutions/articles/51000153873
Did you find it helpful? Yes No
Send feedbackWhat is geomapping in the RIW System?
Geomapping is a new feature included in the RIW System which is transforming the way users can engage with the wealth of swipe data within the RIW System.
Each time a Rail Industry Worker or visitor swipes on or off a site, the RIW System records this within the database. This data has always been available in a tabulated format, but augmenting this data with an interactive map has enabled the rail industry to extract more insights from the information.
Users can visualise Rail Industry Workers who have swiped in at site, and where that site is on a map:

They are also able to interact with the map by clicking on the site icons to bring up more details, such as how many Rail Industry Workers are currently swiped in, where they have swiped in, and what time they swipe in during the day.
Geomaps has been added to both the swipes function and the muster list. You can find out more about how to use these maps on:
Article link:
https://support.riw.net.au/support/solutions/articles/51000305899
Did you find it helpful? Yes No
Send feedbackHow does a company add a site host?
This article details how a company can add a site host to the RIW System for visitor management at sites.
When a visitor attends a site managed by a RIW Kiosk, the visitor will need to select a site host, who will be advised of their attendance at the site by email and SMS.
Site hosts must be an active, current RIW cardholder.
Site hosts can only be selected by a visitor when they are currently signed in to the site.
This instruction applies to the following user roles:
- Advanced Project Admin
- Employer Admin (where designated as a Contractor In Charge of a project)
- Employer Admin - No Payment (where designated as a Contractor In Charge of a project)
- Helpdesk
- Project Admin
- Site Admin
1 | Go to https://app.riw.net.au and login using your credentials. |
2 | Click on Administration > Site. |
3 | A list of available sites will display. Use Search to filter the list. Select the site you wish to add site hosts by highlighting the row and clicking the Edit button.
|
4 | On the Hosts tab, a list of current site hosts will appear. Click on the Add button to add a new host.
|
5 | On the Create Host pop-up, fill in the Search fields and click Search to surface a list of potential hosts. Only cardholders who have a current relationship with your user permission will be searchable. You must have an approved employment or association relationship with the cardholder.
When the host is located, highlight the required host and click on the Select button.
Confirm the host is correct and click on the Save button.
|
6 | The host is now added. You can delete hosts at any time by highlighting their name and clicking on delete.
|


For further guidance on how visitors can sign in to site, refer to How does a visitor sign in and sign out of an RIW Kiosk?
Article link:
https://support.riw.net.au/en/support/solutions/articles/51000309914
Did you find it helpful? Yes No
Send feedbackHow does a company add or update a site address?
This article details how a company can update or add a site address in the RIW System.
This instruction applies to the following user roles:
- Advanced Project Admin
- Employer Admin (where designated as a Contractor in Charge of a project)
- Employer Admin - No Payment (where designated as a Contractor in Charge of a project)
- Helpdesk
- Project Admin
- Site Admin
1 | Go to https://app.riw.net.au/ and log in with your credentials. |
2 | Go to Administration > Site. |
3 | Find the site you wish to update, click on the row and Edit. 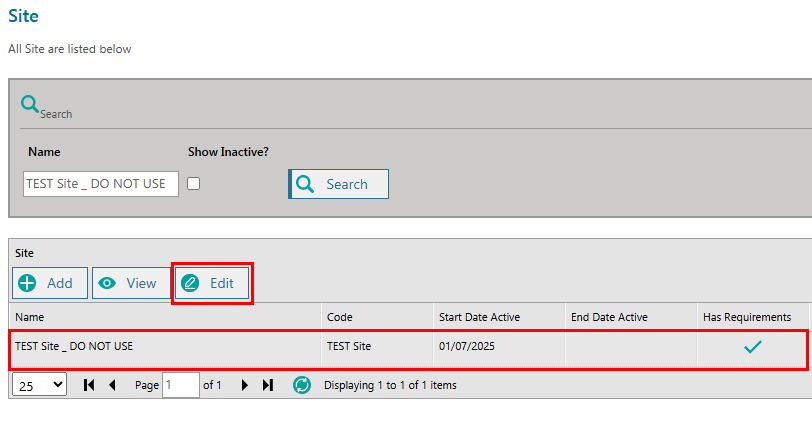 |
4 | On the Site screen, add the Address Line, Suburb, State and Postcode.  To determine if the address can be validated, click on Test Address. If the site is a greenfields site with no current street address, an approximate location will be determined by the suburb, state and postcode. Or try to use a close street location for a better match. Click Save to set the address.  |
For more information about setting up a site, refer to How does a company create a site or edit site requirements?
For more information on how to use the map view, refer to How to use the map to view swipe activity at sites.
Article link:
https://support.riw.net.au/support/solutions/articles/51000311108
Did you find it helpful? Yes No
Send feedbackHow to use the muster list to swipe workers and visitors out of site
This article details how to use the muster list to swipe Rail Industry Workers and visitors out of site.
If a Rail Industry Worker or visitor leaves site without swiping out, this function can be used to clear the site at the end of the shift. Please note that shifts are automatically closed after 24 hours if a swipe-out event has not occurred. For more information refer to Shift Management - How are open shifts closed in the RIW System?
This instruction applies to the following user roles:
- Advanced Project Admin
- Network Manager
- Project Admin
- Site Admin
1 | Go to https://app.riw.net.au and log in using your credentials. |
2 | On the main dashboard, click on the Muster List shortcut. |
3 | The Muster List will display showing all Rail Industry Workers and visitors currently swiped into site. For more information about how to use this list, refer to How to use the muster list. To swipe out a person, locate the person using the search fields or sort through the list. Click on the person's record and Swipe Out.  Confirm you wish to swipe out the person by clicking OK.  The person has now been swiped out of site. |
Article link:
https://support.riw.net.au/support/solutions/articles/51000311798
Did you find it helpful? Yes No
Send feedbackHow does a company make a site inactive?
Employers or companies assigned as the Contractor in Charge (CIC) of a project can edit sites and zones . A project must be assigned by a Network Operator for a CIC to create sites and zones.
⚠️ Important: Do not apply an end date if the site is still active

Only apply an end date to a site if it is no longer in use. You may set a future end date if the site has a known decommissioning timeline, but be aware that:

Once the end date is reached, the site will automatically become inactive.


This means the site will:

- No longer appear in the RIW app for access controllers, spot checkers, or workers using self-swipe
- No longer be available or functional with any RIW-connected hardware, including kiosks and access control systems

To avoid disruptions, ensure active sites do not have expired end dates in the system.
This instruction applies to the following RIW System User Roles:
- Advanced Project Admin
- Employer Admin (where designated as a Contractor In Charge of a project)
- Employer Admin - No Payment (where designated as a Contractor In Charge of a project)
- Helpdesk
- Network Manager
- Project Admin
- Site Admin
1 | Go to https://app.riw.net.au and log in using your credentials. |
2 | Click on Administration > Site. |
3 | To mmark the site as inactive, you will need to apply an end date to the site. Select box End Date Active. |
4 | Apply an end date to the site when the site has or become inactive.
Click Save to complete.
|


For more information about some of the other requirements you can set on this screen, please refer to:
- How does a company add site contacts?
- How does a company add site hosts?
- How does a company configure site working hours rules?
- How does a company set breathalyser requirements for a Kiosk in the RIW System?
- How does a company add and configure kiosk briefings?
Article Link:
https://support.riw.net.au/support/solutions/articles/51000486730
Did you find it helpful? Yes No
Send feedback